Updated: April 4, 2023
At risk of repeating myself, here's a brief intro to this article. I got meself a new laptop, one Slimbook Titan. Then, I spent some time configuring it, tested software and some games, and now we're here, tweaking and having fun. Thus, I need to make the system robust and resilient, and that means backups.
Of all the things you will ever do on a computer, having a proven, reliable backup strategy is the most important one. Without backups, you're at the mercy of silicon, solder and plastic going bust. My Titan comes with two hard disks, two 1TB NVMe drives to be more precise. The first one is used for the operating system. The second hasn't even been formatted just yet. We will do that now. And then some.
Encryption
The idea behind encryption for portable devices isn't about super-amazing security, it's mostly about not having your selfies and similar stuff easily accessible to anyone who may put their hands, without your permission, on your device. Thus, if you lose it or it gets stolen, you want as little hassle as possible. Hence, encryption.
I've already configured a bunch of devices using LUKS encryption during the installation time. In all of these scenarios, the systems had a single hard drive. So there was no great dilemma there. But my Titan has two devices. The first one is encrypted (with LVM) as part of the standard Kubuntu install. What about the other one, then?
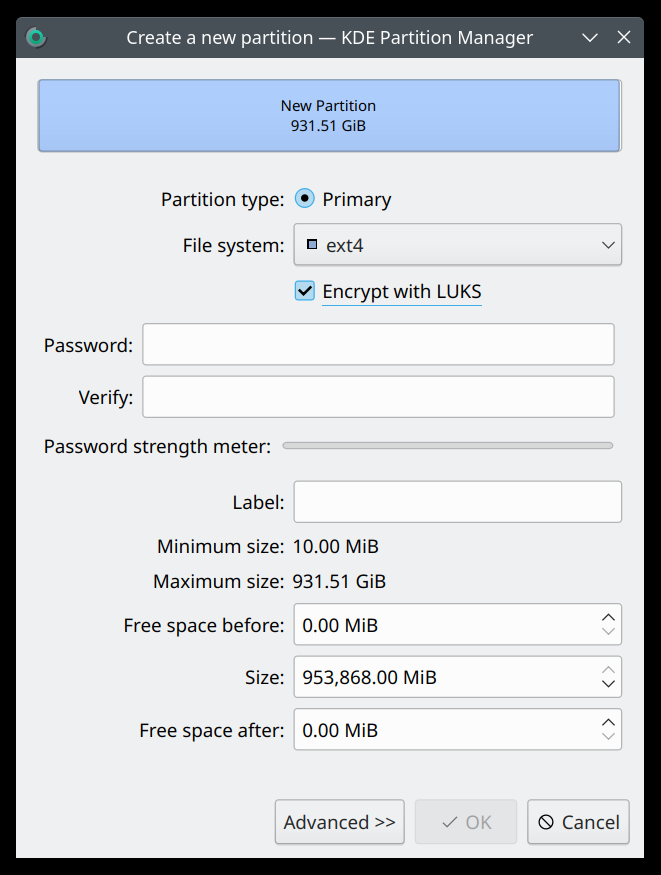
I started by formatting the disk, cor. As it happens, the KDE Partition Manager allows you to create encrypted partition right then and there. No need for a two-step process, no need for any command line. Select the right option in the drop-down menu, type in your password, and Bob's your uncle.
Once the device is ready, you need to make it available to the system, so to speak. You can always manually mount the device (and type in the password), but it is also possible to have it auto-mounted during the boot process, so it's immediately available for use once you log into your desktop session. I went with this second choice.
First, I ran the lsblk command to figure out the topology, and the UUID for this new encrypted partition.
nvme0n1
259:0 0 931.5G 0 disk
├─nvme0n1p1
259:2 0 512M 0 part /boot/efi
├─nvme0n1p2
259:3 0 1.7G 0 part /boot
└─nvme0n1p3
259:4 0 929.3G 0 part
└─nvme0n1p3_crypt 253:0
0 929.3G 0 crypt
├─vgkubuntu-root 253:1
0 927.4G 0 lvm /var/snap...
│
/
└─vgkubuntu-swap_1 253:2
0 1.9G 0 lvm [SWAP]
nvme1n1 259:1
0 931.5G 0 disk
└─nvme1n1p1 259:6
0 931.5G 0 part
└─luks-02ac7a12-ea18-41d2-... 253:3 0 931.5G 0 crypt
Then, I added this identifier to the /etc/crypttab file, which already had my primary disk partition listed. Now, how it works is as follows: the UUID from above will show under /dev/mapper/luks-... In turn, this will actually be a symbolic link to a device directly under /dev, something like /dev/dm-3.
Once I edited the /etc/crypttab, I edited the /etc/fstab file next, so the partition would be auto-mounted. Here, I needed to the /dev/mapper entry (in addition to the existing system one). Something like the output below, notice I omitted all of the usual entries as they are not important.
# /etc/fstab: static file system information.
#
# Use 'blkid' to print the universally unique identifier for a
# device; this may be used with UUID= as a more robust way to name devices
# that works even if disks are added and removed. See fstab(5).
#
# <file system> <mount point>
<type> <options> <dump> <pass>
...
/dev/mapper/luks-02ac... /backup ext4 defaults 0 2
In essence, this is how it should work:
- The /boot partition is not encrypted, because the BIOS needs some way to hand off its work to the operating system.
- The kernel and initramfs are loaded into memory.
- The initramfs contains the dm-crypt module, so it can decrypt the encrypted partition(s).
- If encrypted partitions are identified (matching the crypttab file entries), there's a password prompt.
- If successful, the partitions are decrypted and then mounted (matching the fstab file entries), and the system boots into the user session.
However, this system would not boot ... even after I input the correct password.
What the problem be?
As it turns out, the /dev/mapper/luks-... identifier was incorrect. The dm-crypt module could not find and thus decrypt the partition, and the system could not mount the EXT4 partition it expected to find, and the system got stuck. At this point, I booted into the Kubuntu live session, manually decrypted the root partition (the LVM), figured the name of the root partition (vgdisplay), mounted it, and then commented out the second disk. After this, the Kubuntu 22.04 launched just fine.
I then discovered that the system, for whatever reason had "lost" the UUID and was simply referencing the encrypted partition via its standard identifier, nvme1n1p1. Well, if you ask me, I hate UUIDs, because they are finicky, usually don't work as robustly as they should (compared to raw device identifiers), the risk of things changing (as often touted in the media) is overblown for home user scenarios and only relevant for data centers, and they cannot be remembered by humans.
Ironically, this is what /etc/fstab says:
# Use 'blkid' to print the universally unique identifier for a
# device; this may be used with UUID= as a more robust way to name devices
# that works even if disks are added and removed.
Right ... Number of times the standard device identifier didn't work for me? Zero. Number of times UUID didn't work for me? More than zero. Then again, most modern technologies are like that, and get simply, blindly migrated from data center setups (where disks DO frequently get replaced) into the home environment without any regard for how that may affect actual human users. GRUB2, systemd, binary logs, UUIDs, etc, all of these are not as well-designed for human interaction in comparison to the previous generation of tools. They might be the darling babies of the cloud giants, they are not meant for home use. Simple.
Once I fixed this, the system worked just fine. Both disks are encrypted.
Backup
Okay, two disks, copy from A to B, right? Well, sound simple. First, trying to imagine what a normie would need, I thought, is there a nice and friendly GUI tool that can reliably copy user data from source to destination, with scheduling if needed? This is way harder to achieve than imagined.
There are dozens of Linux backup and replication tools. Most, if not all, are incomplete. They almost all use rsync in the background, they all have similar layout and mode of work, and they lack basic toggles to handle exclusions in a trivial way. I love grsync, but scheduling isn't a thing.
I then tried Timeshift, which is a nice, friendly system backup tool (not for user data), and I've reviewed it in the past. Unfortunately, it refused to run on my system. To be more precise, it ran once and then kept crashing with a segfault every single time since. Even deleting everything (under /etc and /var) and then reinstalling the program didn't make any difference. Thus, I am unable to rely on it for my needs.
Timeshift backup, timeshift-gtk[7987]: segfault at 0 ip 00007f0e6a19d97d sp
00007fff78802bb8 error 4 in libc.so.6[7f0e6a028000+195000]
App config loaded: /etc/timeshift/timeshift.json
Segmentation fault
In the end, I decided to go with a simple setup of my own. I have written a tutorial on rsync a long time ago, and there's my home tar+gpg guide, so some short scripting was in order. Basically, I created two BASH scripts, one for system backups and one for home backups. The former mainly copies /etc stuff, which is where the important configurations are stored, while the latter copies stuff from under /home to /backup, where the second disk is mounted, with some exclusions for unnecessary stuff (like .cache, Templates, etc). Something like the script below:
#!/bin/bash
rsync -avs --delete -l -p \
--exclude='.cache' \
--exclude='.local/share/Trash' \
--exclude='.nv' \
--exclude='.xsession-errors' \
--exclude='Public' \
--exclude='Steam' \
--exclude='Templates' \
--log-file=/home/dedo/rsync.log \
/home/dedo \
/backup/home-dir
exit 0
The last thing is to schedule this via cron, and boom, done.
Conclusion
I have purposefully decided to write this part of my Titan adventures as a separate article, because backups are extremely important. Of course, the specific details are not important. You can choose not to use encryption at all, or perhaps prefer VeraCrypt or TrueCrypt containers. You can use one disks or many, or copy to a network share. You can do any number of things. I merely wanted to show that you can go for an elegant and even somewhat complex setup without any great trouble in Linux. But you need to be a nerd.
The rsync scripts can then run at different times, the home and system ones separately. The data is safely backed up, so if there are problems, it is relatively easy to recover. In the worst case, I would need to reinstall the system, but my personal stuff and important configurations would all survive. All of this is just a precursor to the heavy work with the data stored on Windows systems, but hey, one small step for Tux. We've got till 2025 to put everything in order, and so far, it's going rather well. More on games coming soon.
Cheers.