Updated: December 9, 2025
Recently, I encountered a fresh problem in my virtualization adventures. I wanted to export one of my Linux virtual machines, so I could use it on a different host. On paper, the functionality is there in VirtualBox. File > Export Appliance. Then, you choose the desired virtual machine, decide what format you want to use, configure MAC addresses, and let VirtualBox generate the ova file. On the target host, you import this appliance.
I tried to do this and encountered an error. The GUI said E_INVALIDARG 0x80070057, without too many details. Reading through tickets on the VirtualBox forum, I learned that there could be many various issues for the failure in the import process. Rather than try to solve these potential problems one by one, I chose a different route. A manual machine import, without using the OVA process. Let me show you.
OVA is just an archive
Technically, the appliance is all of the virtual machine data packaged nicely into one file. Inside, you will have your virtual disks (and any snapshots), the virtual machine manifest, and so forth. There's no great mystery there. The import process merely unpacks these, parses the configuration file (.vbox), and if there are any errors it cannot resolve, like virtual CD drive path or shared folder path, it will halt.
Thus, we can do the same, manually.
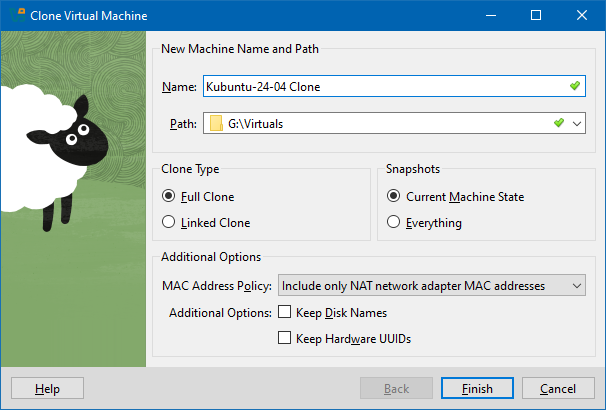
Step 1: Create a clone of your virtual machine
Why you'd want to do this is as follows: it allows you to clone only the latest snapshot, if you use any. This makes the new virtual machine smaller. You will also have fewer snapshots to take of, and take into account when you copy the virtual machine data to a new host. But it is not mandatory.
The reason you may want to copy only the latest state is because it simplifies the machine management, and reduced the amount of data needed for the transfer. If you're doing an over-the-network export, this could make a big difference (even on LAN).
Step 2: Copy the entire virtual machine folder to second host
The structure of any VirtualBox virtual machine folder is as follows: directories named Logs and Snapshots, one or more virtual disks (usually .vdi format), and the configuration file with the .vbox suffix (extension), plus maybe a second configuration file with the .vbox-prev suffix (if you made changes).
The vbox file is an XML manifest with all sorts of declarations that you see in the GUI. You should not edit this file while any machine is running, but you can safely do so for any machine in an offline state. The changes will then be reflected next time you launch that machine. For example, under Media, you will see a HardDisks section listing all of the disks and snapshots:
...
<HardDisks>
<HardDisk uuid="{dfcda294-6feb-4ef8-8bc8-e67ad57e2cc6}"
location="Kubuntu-24.04.vdi"
format="VDI"
type="Normal">
<HardDisk uuid="{f062fe0b-578c-4461-9a10-8d65d28347ac}"
location="Snapshots/{f062fe0b-578c-4461-9a10-8d65d28347ac}.vdi"
format="VDI">
<HardDisk uuid="{f942b89a-49ff-40fa-8d62-e6fdd8a205d9}"
location="Snapshots/{f942b89a-49ff-40fa-8d62-e6fdd8a205d9}.vdi"
format="VDI"/>
</HardDisk>
</HardDisk>
</HardDisks>
...
This declaration tells us the specific machine uses a hard disk called Kubuntu-24.04.vdi, and that it has two snapshots associated with it. You get the idea.
All right, copy all this data, the entire folder, to your second host.
Step 3: Check paths
Before you "import" the virtual machine, you should open the vbox file in a text editor, and look for any "funny" paths. This will include any mounted ISO files, any shared guest paths or similar, anything that would be hard-coded to the first system and might not exist on the second. Any such error will cause the addition of the new virtual machine to fail. This is opaque when you use the OVA archives, but you have full visibility and control when doing it manually.
For example, let's assume you use a different shared guest path on the two systems. The easiest way to find the relevant declaration is to search for the specific path that you know you've used on the first system. Check what it says:
<SharedFolders>
<SharedFolder name="SHARED_FOLDER"
hostPath="G:\Virtual Machines\SHARED FOLDER"
writable="true"
autoMount="true"
autoMountPoint="SHPATH"/>
</SharedFolders>
Here, I used an example of a path set in a G: drive (Windows). But such a path may not exist on your second system, or it may be set under a different letter. So you would need to change this, to say:
hostPath="P:\Different path\SHARED FOLDER"
And if your second system is Linux, it might need to be something else altogether:
hostPath="/home/dedoimedo/Shared-folder"
In addition to these hard-coded paths, you can also use this opportunity to adjust any other setting, including the memory allocation, the number of CPU cores, the use of a specific graphics adapter, and then some. But it is best to make one change at a time, try to add the virtual machine, and see if any errors crop up.
Once you've modified the vbox file as needed, simply double click it. With a default installation, both in Windows and Linux, this specific string and file type will be associated with the VirtualBox hypervisor. If the XML configuration is valid, the virtual machine will now show in your list. Done.
Step 3: Alternative approach
If you do not feel comfortable editing XML files, then, you can do the following:
- Clone the virtual machine.
- Open its Settings (via VirtualBox GUI). Remove any hard-coded paths, like ISO files, shared folders, etc.
- Copy the virtual machine to the new destination.
- Double click on the vbox file to add it to the hypervisor.
- Open its Settings once more, and add the new paths, as they ought to be on the second device.
- Launch the virtual machine and do your work.
Caveats and possible licensing restrictions
As you may have noticed above, I used a Linux virtual machine for the copy/migration process. Linux, and Kubuntu specifically, because this Linux distribution comes with no restriction on use, neither the number of systems, nor the number of "licenses", so to speak.
If you do so with a proprietary operating system, like Windows, you may potentially de-activate your license due to hardware changes. Or you may need to buy a new one. If you use certain (paid) programs that are licensed to a single host or a single running instance, then you also need to take this into consideration, as the creation of new copies of the virtual machine may potentially cause problems with your licenses or the terms of use for said software.
Conclusion
If an automated, nicely wrapped procedure does not work for you, the manual method just might. I have tested the folder copy + XML change approach multiple times, with multiple virtual machines, from and to both Windows and Linux operating systems. The results are excellent. Sure, you might need to adjust a setting or two, but then, you're golden. Within the confines of your software licensing limitations, that is.
Hopefully, this tutorial will come useful. Debugging the specific error code can be tedious, as pretty much any import error will throw it, while the specific workarounds are many and varied. The manual copy procedure is robust, but you need to take a few things into account, mostly hard-coded paths in your configuration. You can edit these before or after the copy, to make sure the new virtual machine can be added seamlessly. Well, there you go. Happy virtualization.
Cheers.